DIY Teacup Candlesticks – A Thrift Store Christmas Project
Looking for an easy DIY for Christmas? Here’s a simple idea for cute DIY teacup candlesticks. All you need is 30 minutes, some basic shop tools and thrift store teacups.

Hello friend, I am so glad you are here! I have the cutest and most charming CHRISTMAS CRAFT IDEA for you.
See those teacups? Aren’t they the prettiest candle holders you have seen this Christmas season?
This teacup candle holder project took a long time to plan and only 30 minutes to make (with a bit of help). And it turned out so good, better than I had thought.
I got the idea a long time ago, but I needed some specific supplies to make my vision come to live. A couple of weeks ago I lucked out and I was ready to go to work.
Basic DIY is simple: drill holes in thrifted teacups, coffee cups, espresso cups and/or small pitchers, stick candle holder inside and call it a day.
Details were a bit more involved. Let me show you how we did it:

How to Make DIY Teacup Candlesticks
The basic work of this project is drilling holes in the bottom of the teacups.
I had been doing some test drills with several drill bits, but they wouldn’t go through the porcelain. Surprisingly resilient that stuff: concrete drills, tile drills and stone drills where merely capable of scratching it.
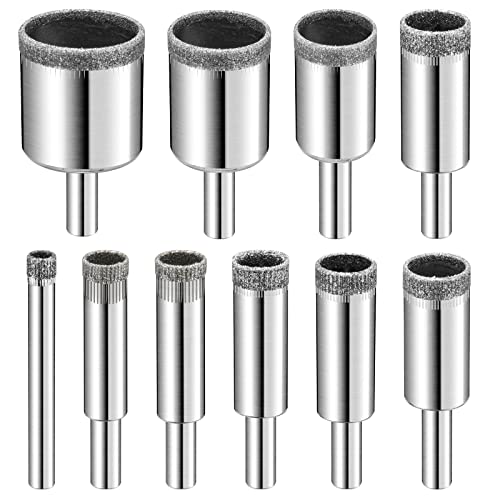
To effectively drill a hole in a porcelain cup (without breaking it) you will need a diamond drill bit.
 Buy Now →
Like these. They need to be water cooled, hence the set up inside a container filled with water. These babies went through the bottom of the cups like butter.

To make sure that you drill perfectly vertical and that you don’t slip, a drill stand is the way to go. If you have steady hands you might not need it, but for us it made the job so much quicker and easier.

The man set up the drill inside the drill stand. And then set the drill stand in a container filled with enough water to cover the top of the teacup.
This looks a lot like the drill stand we have:
 Buy Now →
 Now that I had my basic tools collected it was time to go thrifting.
I had to find myself some cups. Since I am a big lover of all things white, I went for these basic tea cups. But I think some pretty floral vintage cups would look great too.

Choose a variety of sizes and heights. This was my first loot. I later added the espresso cup and the milk pitcher to add some more variety.
Just remember, you are going to use these upside down, so turn it over before you buy. The bottom should be undamaged and when turned over it should stand straight (jars and pitchers are sometimes wobbly when standing upside down).

Mini Metal Candle Holder Inserts
Buy Now →Finding the candle holder was the most difficult part of this project. It wasn’t until I figured out how these things are called in english that I was about to source them. Turns out they are readily available on Amazon. If only you know the right words…
I used a bit of glue to secure the candle holders in the cups, but I don’t think it is really necessary, they are not going anywhere.
And then it was time for the foofing and decorating…..

I think those little ornaments take this project right into Christmas. After all there is no such thing as too much candle light and silver ornaments at Christmas.

Funny that the last one we made: the little milk jug, is also my favorite.

And when Christmas is over, I’ll just remove the ornaments and I’ll have teacup candle holders that are perfect all year long. And if you can’t imagine how they would look styled differently, then just take a look here at this summery post where I used them in a Farmhouse table centerpiece.
Ha, how about that upcycled Christmas project?
Don’t forget to pin this teacup candlestick project to Pinterest!

Very clever! Those cups can definitely be stubborn sometimes getting through them. So glad to be part of the Christmas Junkers United this year with y’all. #christmasjunkersunited
What a clever idea for candles! I love your neutral Christmas decor, Marianne!
These look beautiful, Marianne, and I love that they can be used year-round!
So very pretty Marianne. We have a wet saw, I have teacups, but do we have the right bits? If so I’ll be giving this idea a whirl myself.
I have always wanted to try a project like this – so clever and thanks for all of the useful information!
You are welcome!
What a wonderful idea!! Lovely like always 🙂
Marianne – Wow. You have some fancy tools over there! 😉 Haha, but totally worth it. I love the end result! So special and festive!
xo Michael
Marianne,
These are so fabulous. Love your creativity on these. Beautiful.
Kris
This is simply lovely! I want a drill press!
That is the coolest most clever idea ever! I so love that all the basis are the same yet different… so beautiful! I’m so glad you showed a picture of that drill press stand.. I have one but didn’t know what it was! hahaha
Really gorgeous, Marianne!
bases… you don’t have an edit feature on your comments. Can you put that into effect just for me please? 🙂
I’ll get on it, right away.
I’ll do anything for you…..
These are so beautiful! I want a drill press as well! Great tutorial. 🙂
Schitterend Marianne. Groetjes Ans
Love love love it! And I have learned something new again. Thanks for the link to the candle holders, I have been looking for those to put inside gourds for winter.
You are welcome! Glad I could help you out with your project. Good idea to put hem in gourds, will look pretty I am sure.