How to turn tins into lanterns
Hello my dear friends, ah the weekend is over, Monday is lurking around the corner again. Isn’t that a shame. Come Sunday night I always feel I need at least one extra weekend day. a day to rest and recuperate from my weekend crafting madness.
Yep, your read that right I have been on a crafting binge all weekend. I raced through my Sinterklaas preparations to dive straight back into Xmas crafting. But speaking about Sinterklaas. We had our ‘pakjesavond’ (aka presents night) yesterday and it was again a memorable one. The surprise packages were precious (I got a spider in a (world wide) web ![]() ), and a giant USB stick made by my brother received a lot of applause too. And Saint Nicklaus definitely had a lot of inspiration when he was writing poems, they were all good.
), and a giant USB stick made by my brother received a lot of applause too. And Saint Nicklaus definitely had a lot of inspiration when he was writing poems, they were all good.
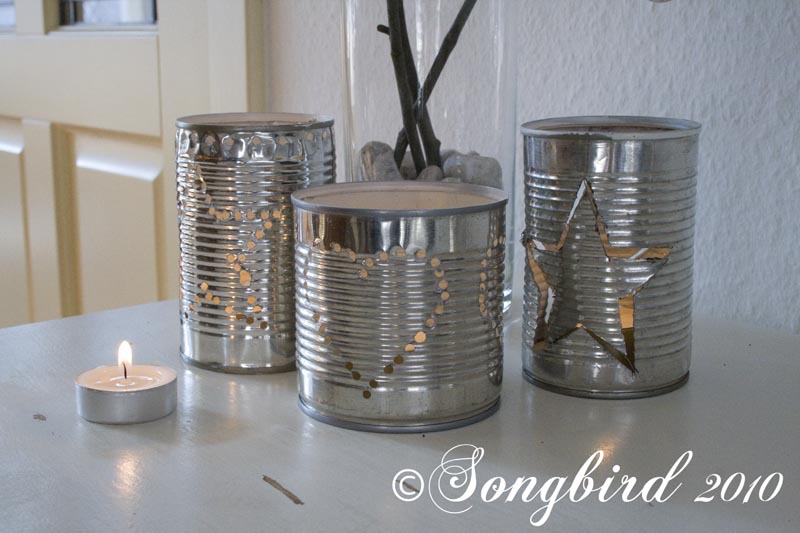
But enough of that, you didn’t come here for my reminiscing about last nights’ Sinterklaas festivities. You want to know how to make those sparkly and cheap tin lanterns.
Well my friends I will reveal all.
There are two routes you can take when making these. The long one I took, or the short one I discovered afterwards. Your choice really, I don’t mind either way.
I am linking this up to Sarah’s monthly Before and After party. Except I do not have a proper before picture. You will have to use your imagination for that. Just think of a can of peeled tomatoes and you’ve got it.
Here are the steps:
|
Songbirds Way |
The Short Cut |
| 1. Come up with this project, decide you want to do it right here and now. Go to the recycle bin, grab some tins that have been lying there forever, pinch your nose because they smell bad and spent at least an hour trying to get the gunk out. | 1. See Songbirds’ lantern tins, decide you want to make those. Start collecting your new tins and clean them properly right after using. Removing the wrapper and the glue thoroughly. |
| 2. Hastily remove the paper band. Decide that you can worry about the leftover glue later. | 2. Spray paint the inside of the cans with the color of your choice. |
| 3. Look for some templates you can use. Decide that the star you have lying around is perfect, even though he looks a bit big. But he, you will save so much time by not drawing a smaller one. | 3. Find some templates. Remember that the lanterns will look the best if there are only small holes or lines, through which the light will shine. |
| 4. Draw the template on the can. Decide that it is really smart to use a permanent marker for that, because the lines are nice and big. | 4. Draw the template on the can. Use a pen or pencil with removable ink. |
 |
|
| 5. Grab your love (no not that way, let’s keep our thoughts out of the gutter here ladies), and persuade him to leave his study books for 15 min. so he can show you how the Dremel works | 6. Decide on which way you are going to cut out your shape or punch your holes. If you are using a Dremel follow Songbirds steps 6,7,8,9 If you are punching holes go to your step 7. |
| 6. Put the first tin in the bench vice. Be real smart and cover the vice with some rubber so that it won’t scratch your shiny surface. | |
| 7. Cut the star out with one of those round, metal cutting bits for the Dremel. | |
| 8. Watch the sparks fly (sooooo cool!!) and be glad you wore safety glasses. Oh and your happy about wearing sound mufflers too, because that screeching metal is loud. | |
| 9. See the Dremel cut through the tin like a knife through butter. Get overly confident. Cut out two stars on either side of one can. |
|
| 10. Decide you want a dotted pattern for the other tins. Change the Dremel bit to a drill bit. Realize you have no clue whether that is a metal drill bit. Think: ‘no time to find out I’m on a mission’ . | 7. If you are drilling your holes: use a very small drill bit and make sure it is meant for metal. If you are using a hole punch: choose a template that your hole punch can reach, or remove the bottom of the tin. If you don’t have a drill or a hole punch. You can freeze water inside your tins and use a nail and hammer. I have no experience with that method but I have heard it works well if you can prevent the bottom from bulging out when freezing. |
| 11. Start drilling holes along your marker line. Enjoy the process for the first 20 ones. | |
| 12. Realize your drill is getting dull very fast and you need a plan B. | |
| 13. Go to plan B. | |
| 14. Get your Crop-a-Dile hole maker that is fit for metal too. Start punching small holes along the outline of your marker line. | |
| 14. Realize that the Crop-a-Dile can’t reach the bottom of one can. Get your can opener and remove the bottom from said can. | |
| 15. Continue punching holes. Realize that without a bottom the can is less stable and wish you had a less holey design. | |
| 16. Finish all three cans. Stand back and admire. Do a test run with some tea lights. | |
| 17. Realize that the star you cut out is way too big and looks ridiculous. Stay confident in your ability to ‘fix’ things. | 8. You will probably have chosen very small stars to cut out. Alternatively you could cut out a star as big as Songbirds one, but don’t cut all around. Leave it attached at a couple of tips and bend the cut edges inward to form a small gap where the light can shine through. |
| 18. Cover the outside of the tins with newspaper and masking tape. Spray paint the inside white. | 8a. Or decide you want to try soldering too and go Songbirds’ route all the way |
| 19. Leave it to dry for several days. Try to remove newspaper. Find that the paint has dripped through the holes and the cut-outs and that the paper is now sticking to the paint and the glue you didn’t remove (see step 2). | |
| 20. Spent a good couple of hours trying to remove the paint on the outside, (oh and the permanent marker too, see step 4) with paint remover. End up scratching most of it off with a dull knife. | |
| 21. Consider the holey tins done, when you remember “It doesn’t have to be perfect to be beautiful”. Come up with plan C for the star lantern. | |
| 22. Go to plan C. | |
| 23. Remember that you now have a soldering iron in your basement, courtesy of your dear father-in-law. | |
| 24. Cut the cut-out stars one size smaller. Solder tiny bits of metal wire to four points. | |
 |
|
| 25. Think this is so cool. It works and it is easier than I thought. Get overly confident. | |
| 26. Try to solder the metal wire to the inside of the tin. Realize it won’t stick to the paint inside. | |
| 27. Try hot glue. Come to the realization this is a really stupid idea. Because a) the hot glue won’t stick either, and b) would melt again when a candle would be lit inside the lantern. | |
| 28. Try soldering one more time. Solder one star in its opening nicely (don’t even try to figure out why it does work now). | |
| 29. Realize there is no way you can reach the inside well enough for soldering the second one in its opening. Solder it with a big blob on the outside and call that the backside. | |
| 30. Place all three tins together, light some tea lights inside. Stand back and be very happy on how they turned out. | 9. Place your tins together, light some tea lights inside. Stand back and be very happy on how they turned out. |
So 30 steps or 9 steps. It really is up to you ladies. But I know which route I am taking next time.
And just to remind you that it is really worth it. My finished tin lanterns one more time:

You will let me know if you are going to try this, aren’t you?

I love them, they look great. I did laugh a lot reading this too as I always learn the hard way how to make things! 🙂
Thanks for the tutorial. I had guessed you used nails. But, now I am REALLY going to have to ask Santa for a Dremel for Christmas 😉
Brittany
http://www.prettyhandygirl.com
So cute!!!
Hoi Marianne,
wat een leuk idee, dit ga ik zeker proberen.We hebben een Dremel dus dit moet gaan lukken.
Fijne week,lieve groetjes Ingrid.
Ze zijn erg leuk! Zijn ze ook ergens te koop 😉
Wat ontzettend mooi Marianne, je heb er een sfeervol geheel van gemaakt.
Ik wens je een fijne week toe.
Lieve groet, Mea
Marianne, I just adore this idea! You are so clever.
Brenda
Incredibly clever. I love how they look also! Found ya over at Thrifty Chick. Now following you. Would love a follow back! I look forward to looking around your blog.
take care.
Debbie.
http://dejarenew.blogspot.com
I had so much fun reading your ‘tutorial’. I am willing to try a Dremel tool and will follow your shortcuts. Thank you for sharing.